
The Pre-Master Guide is an easy to follow reference sheet to what would be recommended from you before being handed off to be mastered to get the most ideal results out of your tracks while still in the mix process.
It should be noted that things don’t always go this way for many reasons. Maybe it’s too late to go back, or it’s just not what the mixing engineer gave you. If it can’t be changed, it can still be mastered! We are very good at working with whatever you have (the important thing you want to note is if the track is peaking over 0db, once it peaks in a bounce you can’t take that out!). For those that have the option and want to know a more “correct protocol” in preparing a mix for the master, this is for you!
Below the Pre-Master Guide, I have also included information on uploading your CD metadata to Gracenote. I do not offer to create the ISRC codes anymore as it is generally handled by streaming services and online distributors, but it still comes up so it’s there if you want it.
I know people have a lot of questions about mastering and its process, so for those interested in this knowledge, I have included some articles about mastering at the bottom of this page. I will also continue to add to this guide and articles of interest as more questions come up to help cover more ground for more people!
The requirements for an ideal pre-master (your mix!) are very simple and logical but probably wouldn’t come to mind without prior knowledge or research. To make things easier I have written up this simple guide. Try to meet these criteria as close as possible BEFORE you send your tracks off to be mastered. This will save you and the engineer time and effort uploading tracks over and over and going over ways to make things better before the mastering process can begin.
Of course, I know if you have made it this far you want to do what you can to make sure you get those best results. If you yourself are mixing the project, it is important to remember that mastering is not magic used to make undesirable sounding tracks now sound good. If you build a shotty house, a paint job will make it look better but it’s not going to save it.
Please also note this guide can be used universally for your future pre-masters. Though different engineers may request different finer details, it is still a great point to keep in consideration every time you start and are in the mixing process and realistically should be acceptable baselines for any mastering engineer to work with.
But first…
It’s magic done by… blah blah. No, it’s not at all. It’s quite a simple concept but to do it well requires in-depth and correct knowledge with a technical understanding of audio. As well as lots of practice, trained ears and suitable acoustics with high-end monitoring. For the true results, specialised equipment to achieve the desired tasks and being able to know the ins and outs of that equipment.
Honestly though, to keep it simple: it’s a very fundamental step that works as the final stage of the production of a track. Bringing out all of its best qualities and ensuring the best playability through any desired medium. Be it vinyl, digital, streaming, cassette, broadcasting. You name it. They all have their own special requirements. The easiest way I could describe where it fits into the process would be to look at the whole construction of the track like building a house. You start with the blueprint (songwriting, band/artist perfecting the performance to know how they want it to sound), then you have the gathering of materials (tracking), the construction (mixing) and then the varnish, the polish, the paint… the thing that goes on at the end to make it pop and bring out it’s best characters. That’s mastering. This is done by doing very fine and detailed techniques. For ideal results, it requires good equipment, practised and knowledgeable technique and most importantly a well-trained ear. It’s finding those characters that make the track and the mix stand out and put them on their platform while cutting the unnecessary clutter and controlling the mass of frequencies dancing around. It’s making sure there is consistency between the levels of all the works in the project and finding the balance within the dynamics (and taming of dynamics). Personally, I use a collection of analogue hardware that adds its own beautiful colours and charms to the mix including things like valve compressors, EQs, summing mixers and all sorts of goodies. I also use an arsenal of digital tools that I have learned inside and out for fine-point work and to achieve other detailed sonic tasks. Many if not almost all mastering engineers nowadays do the same.
Important note: Though I do personally offer mixing and mastering services, and do offer these together.. I think it’s very important for people to remember this if you can afford the option of separate engineers:
You only get to listen to something for the first time once!
Now without further ado…
This means that there is a gap between the highest peak on the tracks volume meter is approximately -3db from the 0dB peak on the master meter. Even if it goes above -3dB, that’s still absolutely okay. Most important is it never hits above 0dB (with a limiter off), but aiming for -3dB is best mixing practice. The reasoning is, I use specific equipment and gear that will alter the amplitude of the track and this will require some room to move, enabling me to choose where boost and cuts will be without the risk of clipping or worse, compressing and boosting clipping tracks! Please also note that just lowering the master fader is not the best way to go to achieve this if you have any potential clipping or popping present, as they will still be present. The master fader is a POST-FADER fader. This means it’s simply just lowing the volume of whatever is going into it, including your peaks. You are best to lower the individual tracks/busses themselves if early enough in the mixing process or lowing from the Pre-Master fader which is where the tracks should be bussed BEFORE going into the master fader. This can be difficult later when detailed factors like automation come into play! This is why I put this first, in hope that it will be always considered from the start of your mixes. At the very least you should be able to bus them into an AUX Pre-Master fader at any point so all is not lost. You will also find how much more open your mixes really sound when you don’t mix them so loud.
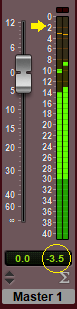
As you can see from this image, the master fader is at unity (0db) and the peak of the track is hitting -3.5(db)
There are some things I’m sure are on there that you feel must be on there, whether it be for a practical or a stylised decision. There are also some things that just have to go and should be left to the people you’re asking to do those jobs, like the mastering engineer. Compression and limiting are a big one. Where the limiter on a pre-master is a must go, light compression can be welcome (in my opinion no more than 1-2db gain reduction on a mix) as long as it is done correctly and with knowledge behind it. Over compression can destroy a song and if it’s already heavily compressed before it gets to the mastering engineers ears and lovely hardware, then there can be little to no give and you’ll be selling yourself short. EQing is more flexible, though a tip I could give to anyone looking for beginner tips is to put yourself a Hi-Pass Filter (HPF) at the start of the chain between 30-50hz/@12db (use your ears!). This cuts away sounds that unless you know why you want them there, you don’t want them there.
RANDOM MIXING TIP: I’d suggest putting a HPF much like this on the start of every track in the mix too, simply put… If you want it in the subs cut at 40-50Hz, if you want it out of the subs cut 90Hz+, use your ears to pick where the sound is audibly affected and stop just before it is).
Now this one can be simple and complicated at the same time so I am going to try and keep it basic and you can look into the articles if you want to know more… Basically, whatever the tracks are recorded at within the mix session or whatever the mix session is set too in terms of Sample Rate and Bit Depth (Not ‘Bit Rate’ FYI…) is what I would want you to send in a single stereo file. If the session is set to 44.1kHz/24bit then you can absolutely bounce it as that. Ideally, you would want to be working at a minimum of 48kHz/24bit where possible though. Uncompressed WAV files are the most accepted and recognised but AIF is also acceptable. I have received some weird ones before honestly so it helps to stick to WAV to avoid potential software issues.
This one is a sneaky one beginners let slip through the radar but make sure you do NOT have ‘Normalize’ selected on bounce/export. This is very important. Normalizing attempts to even out the sound, usually by finding the peak sound and matching the rest of the track with it. Just make sure it’s off for everyone’s sake.
Great work making it this far, it’s a lot of information! Always feel free to consult this guide at any point in the mix but I hope at the very least it cleared some things up and even better if you came out of it just a little bit more knowledgeable. I thank you for taking the time to read this and take any of it aboard.
As this is merely a guide to help with correct process and not so much a lesson on mastering, here are a few articles for the knowledge-hungry to help you understand more:
iZotope on Mastering (FYI: I don’t use their mastering plugins in my sessions but I love this company):
https://www.izotope.com/en/learn/what-is-mastering.html
Sample Rate & Bit Depth:
https://www.headphonesty.com/2019/07/sample-rate-bit-depth-bit-rate/
Understanding Compression:
https://www.sweetwater.com/insync/beginners-guide-audio-compression/
Disclaimer: These articles are not where I gained any of my education, skills or knowledge. I sourced them for you when writing this guide.
Self-described as:
“Gracenote is a free service that maintains and licenses an Internet database of album content
and information. It is through Gracenote that services like iTunes allocate your album info
and share it with millions of users. Below is a step-by-step guide on how to upload your
finished project using iTunes to the Gracenote database.”
And for those looking for the guide I have uploaded it for you here:
Download Guide
Guide written by Shane Jarvie-Kohn at Moreish Studios.